Welcome to the S0lRider site!
- Why Sol or Solar? ... well, this robot is charged by solar energy.
- Why Rider? ... Rider as in Knight Rider’s TV show, yeah S0lRider can be controlled via voice commands from your (Pebble) smart watch in addition to an Android App… last but not least S0lRider has also red scanner lights :).
Still want to know more? great! Please check the table of contents section below for a listing of parts used to build S0lRider, diagrams, source code and lessons learned into building this robot.
… Now if you don’t mind me asking if you find this project inspiring, useful, just kind of cool please consider donating for my fund raising cause here.
https://zambiawellsfargosep2016.everydayhero.com/uk/daniel
Donations will go to Habitat for Humanity Great Britain which is the charity organization I am participating with in the house build. ANY amount no matter how small or big is wholeheartedly welcomed!
Alternatively tweeting about S0lrider or sharing it on facebook is much appreciated.
Tweet
THANK YOU!
Table of Contents
Diagram & schematicsParts/BOM
Tools
Software Used
Source code & Applications
Notes on chassis
Notes on Pebble app
Notes on ESP8266 program
Cheaper alternatives
Lessons learned
Planned improvements
Potential applications of S0lRider
Disclaimers
Credits & acknowledgements
Rationale for this project
Contacting me
Diagrams & Schematics
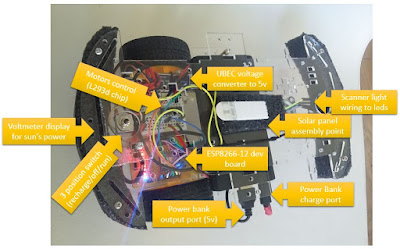
Overall parts (solar panel has been detached).Click on the picture to enlarge.

Fritzing Diagram


Information flow diagram

Parts/BoM
I tried to chose as much as possible cheap parts and recycled some materials. Actually doing a quick calculation of the cost of the parts used in the robot itself (not counting the phone and Pebble watch or tools used to put it together) the cost would be in the range of $45-$55 depending on the chassis and battery option you choose.
- Esp8266-12 board. Chose this one for its price and also because it incorporates a voltage regulator chip on it.
- Chassis (2 motors, 2 wheels, 1 universal wheel). Note: I used this 4 wheels chassis to give the S0lRider more a car look and because of future improvements (see here), however the pieces would fit in a smaller chassis like this 2 wheeled one.
- Dupont jumper wires (male to male, female to female). This can be seen an overkill because you can reuse and solder ordinary cables but I explain later why for building things for a first time or prototyping it may make sense to employ these easily attachable/detachable wires.
- Old power bank (now discontinued). Tried other power banks and they worked well, make sure they provide 1.5Amps or more.
- Android phone. Tested on Motorola Moto E (Android 4.4.4 kitkat) and Samsung Galaxy A3 (android 5.0.2 Lollipop)
- Small bread board
- Red led x 5
- Solar panel 12 volts 3w polysilicon solar cells
- Recycled laptop packaging for bumpers
- Diode, considered optional for this specific layout as the power bank should not emit current back on its own charging port to the solar panel.
- Spare microusb cable I cut in two
- Ubec voltage converter
- Voltage meter
- Switch: 6pin Dpdt 3 states On-off-on
- L293d chip
- Pebble Time: S0lRider can also work without it as the android app provides a joystick.
- Ferrero rocher recycled plastic case to hold switch firm to chassis
- Nylon Ties
Tools
- USB to serial converter
- Computer to at least load program ESP module and potentially flash it if ESP module doesn't come with NodeMCU (windows, Linux or Mac would work).
- Wire cutter
- Soldering iron plus associated kit. Despite I used a breadboard to interconnect things some of the connections needed soldering (i.e. jumper wires to main switch)
- Cutter
- Glue gun
- Screw driver
- Stripping pliers
- Small wrench
- Insulating tape
Software
- Android Studio: for coding the android app.
- ESPlorer: for coding the ESP module.
- esptool.py: to initially flash ESP board with NodeMCU firmaware
- CloudPebble: yes you can code your Pebble app in the cloud! :)
Source code & compiled applications
Please see below links to download the various components and source code
of S0lRider, you can find in other sections below a description of the various
components you can download below.
- Overall GitHub repository
- NoceMCU firmware file I used (others could work well too)
- S0lRider Lua programs (for ESP8266 module)
- Compiled Android app. You will need to allow installing self signed apps.
- Source code of Android app
- Compiled Pebble Time (PBW) App
- Source code of Pebble Time App
- Pebble time oficial repository (soon)
Notes on the chassis
- The bumpers are recycled laptop packaging parts bent a bit to accommodate to the shape of the plastic chassis.
- To fix the switch to the chassis a transparent Ferrero Rocher box was used tied with screws.
- Nylon ties have been used to fix the power bank to the upper chassis floor and tie some wires together.
As a picture is worth a thousand words let’s show some pictures: front part of S0lRider showing the scanner lights.

Easy access to pins via built in wholes, still you can drill more with a drill driver if needed.
S0lRider sunbathing ;) this is recharging batteries. On pictures the solar voltmeter display does not show well because of its quick refresh rate, check out the video.

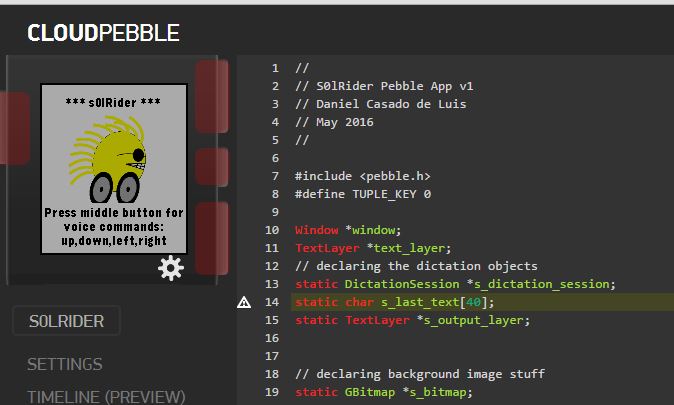
Notes on the Pebble App
Pebble puts at your disposal great tools and documentation to code your own applications, S0lRider’s Pebble app was actually built on the cloud on Pebble’s fantastic CloudPebble online IDE.
- It was the first time I used an online/cloud IDE and despite some minor glitches it worked very well. One of the glitches is that the debugging on physical watch option does not work well because of web browser’s web socket security restrictions.
- Still you can use the CloudPebble emulator that appears on the upper left corner after compiling an app; however some functions such as dictation or communication don’t work on the emulator.
- To overcome to this situation you would have to run the app you just compiled on your physical Pebble. The fastest way I found to do this is to have CloudPebble open on the smartphone where the official Pebble Watch application (not to confuse with S0lRider’s android App described below) is running and click on download PBW after compiling. After downloading and opening it will be automagically installed on your physical Pebble Watch.
- The middle button of Pebble Watch starts a dictation/voice session so that you can send commands to Pebble. The accepted commands are up, down, right, left. Up and down was used instead of “forward” and “backward” as the latter are longer words.
- Once the command is given you have to press the middle button again and it will be sent to S0lRider via the Android App. So it is first transferred to the Android app via Bluetooth and then from the Android App forwarded to the S0lRider car via WiFi.
- The car will hence start moving, to make it stop you have to press the down button of Pebble Watch.
- As you show on the video S0lRider will also “blink” its lights if you shake your Pebble Watch. In the future improvements sections it will be evaluated using the Pebble accelerometer to actually move the car too.

Notes on the Android App
S0lRider’s Android App is coded in Java using AndroidStudio. AndroidStudio can seem a bit complex initially, mainly because of the various files that come to play when coding an Android app; however once you get used to them AndroidStudio becomes a great tool to develop Android Apps. Besides there is also abundant information and forums out there (StackExchange).
- As mentioned below in the credits the Android App joystick functionality was built based on the great joystick application example provided by AKexorcist. Several upgrades were added to AKexorcist joystick example support communicating with PebbleWatch to receive voice commands and accelerometer instructions and to forward these orders to the ESP8266 chip on S0lRider’s car.
- Pebble communication occurs over Bluetooth and Pebble Android libraries takes care of this. Communication with S0lRider car itself (the ESP8266 chip) occur over WiFi, over UDP to be more precise. Android Java TCP/IP libraries are used to handle this communication.
- The default option to connect S0lRider’s Android app with the car is to start a hotspot on your phone, this is an option existing in majority of Android phones today and it is trivial to do. An alternative is also provided if your phone didn’t support hotspot creation, see note 1 below.
- The ESP8266/LUA application has to have the correct ESSID configuration and password to be able to connect to your hotspot. Android phone’s have the required menus to define the ESSID of the hotspot you want to create and the associated password.
- Once S0lRider car has connected to the hotspot on your phone, the car must be obviously on , you will notice in your phone’s hotspot configuration that the car connected and its given IP address.
- Armed with this we just need to specify the car’s IP address on the S0lRider application as displayed on the picture below.
- Once the IP address is properly configured move the joystick by pressing the circle on your phone screen or pressing the light button.

Note 1: There is an alternative option if your android phone does not have the capability of hotspot/creating an access point. An alternative LUA/ESP8266 app is provided whereby the car starts an access point and you connect to it with your phone.
Note 2: Creating a hotspot on your phone is also needed so that when using Pebble you still have data access. Pebble dictation API requires your phone to be able to connect to the Internet, if you connect to an AP created by the car using the note 1 above your Android phone would try to connect to the internet via the car and fail to do so.
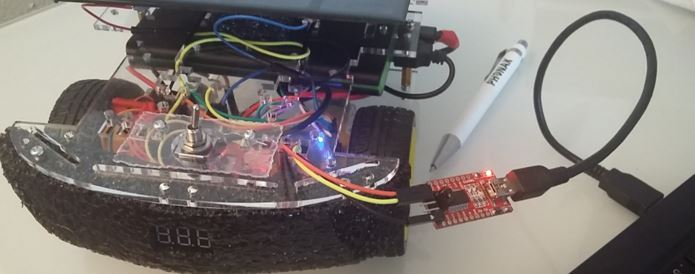
Notes on the Lua/ESP8266 program
The program running in S0lRider’s car brain is an inexpensive yet powerful ESP8266 chip from ExpressIF. The chip is in this case was sold soldered into a development board that facilitates access to the various pins. The ESP8266 chips typically come with a default firmware that needs to be upgraded to NodeMCU firmware which support the LUA code used for S0lRider.
The process for upgrading the ESP8266 chip can be found on my other blog here.
Some quick notes regarding the three files provided:
- init.lua: executes after boot time, it contains an timer/delay and then launches either the default S0lRider car application or the alternative.
- s0lriderPebble.lua: S0lRider Lua program to run when using Pebble and want to send voice commands. Because the dictation API requires internet access if you would set the ESP module as an Access Point your phone would lose Internet access as Wi-Fi has priority over GSM/4G data networks. Therefore in this mode you need to set your android phone as hotspot for S0lRider to connect to it.
- s0lrider.lua: S0lRider Lua program when your phone doesn’t support creating a hotspot or you are not using use Pebble and hence you are not using Pebble dictation. The car/ESP8266 becomes a wireless access point you connect with your phone.
The code within s0lriderPebble.lua and s0lrider.lua basically starts up a UDP server. UDP (a best effort protocol) was found preferable over TCP as it has a faster response time, something desirable for a moving robot. Additionally the Lua code sends instructions via 4 pins to a L293D (dual H bridge) to control the two motors based on the UDP packets received from the Android App. Finally this Lua code also takes care of activating the red scanner lights.
Cheaper alternatives
One of options to obtain a cheaper version of the car could be using single batteries instead of a power bank. Therefore I am providing another design/build option for those ones that want to try, It adds a bit of complexity but it can help reduce costs.

It basically consist of using the following:
- 2 x Li-ion 3.7V 18650 Rechargeable Battery. I tested with these Canwelum because it comes with a safety circuit. There are other brands and cheaper unbranded batteries but makes sure they come at least with protection circuit to avoid potential surprises.
- 2 x Li-ion battery charging circuit.
- 2 x battery holder to host the Li-ion batteries.
- Reuse the 3 position switch described above and remove the power bank.
Various internet sources don't recommend charging and using the batteries at the same time, for this reason we can use the 3 position switch to alternate between a charge and running state as described in this great Adafruit post.

Lessons learned/prototyping advice
- In building S0lRider, apart from my initial ignorance about of the most of technical knowledge required, I did not have a definitive idea or design. This made me change my plans several times in the process of building it. By building it with easily assemble/dissemble pieces (i.e. using dupont jumper wires as much as i could) it helped me a lot to gradually adapt/solve the various challenges I came up with.
- An added benefit is that then your project can be easily assemble by others or they can use it as a baseline. As you can see on the chassis section the car can be assembled and disassembled as majority of parts can be detached or un screwed.
- When facing errors do as programmers do to troubleshoot: divide and conquer. Test the various main sections of your project separately, i.e. Pebble App, charging circuit, ESP communication with H bridge and motors, etc.
- Keep your eyes, ears, senses open for new ways of implementing your initial idea or solving roadblocks. For instance I was having some challenges to design the battery/battery charging circuit until I realized a solution I had just in my face which was recycling a power bank I already had.
- If challenges with ESP8266, don’t desperate, you are not the first or last, check my blog post here on my “adventures” with it.
- Ebay, BangGood and AliExpress have many products with free shipping. Check ebay.com instead of let's say ebay.co.uk even if you are not based in the US as currency conversion when paying with PayPal may be more beneficial.
- As you have to wait 2/3 weeks for free delivery option and given the reduced price from these sites, sometimes it may make sense you buy a pair of items instead of just one in case one broke, so that then you don't have to wait that long again.
Improvements
In this section I list some of the improvements I am planning for future versions of S0lRider that I plan to add to this site:
- Use the Pebble accelerometer to control the car by wrist/hand movement, not just the scanner lights.
- Employ a pass through battery so that S0lRider's batteries can get charged and move at the same time. Not all power banks support this feature, there are several brands out there, I personally bought a Zendure A8 and will be leveraging it in future S0lRider versions as I will give me chances to connect more power-consuming devices such a Raspberry Pi.
- Everybody has suffered ESP8266 stability issues, unfortunately s0lRider is no exception and sometimes it restarts or neglects to boot up properly, next version will consider including capacitors to give more overall stability. This post does a great explanation on this topic.
- Add two front wheels that are controlled by a servo for direction, already planning to use some Lego pieces for it.

Potential applications
This is
obviously a learning project, however I can see it could serve as the basis for
some applications and be able to help people:
- Voice control can help people with physical disabilities. Future versions of the project can allow it to bring, pick, carry things in a house.
- The other day I was thinking how cool would be to incorporate a sort of hammer or ground vibration thingy so this could be used in mine infested fields as a mine detector or canary. Given S0lRider's price if the car blows up it will not be any biggie, and always be worth than any body’s life.
Disclaimers
Build, try,
play with this at your own risk. Voltage used in the project should be risk-free from humans but using different batteries or components may have different
behaviors and could cause harm.
I am not an expert in either of the fields and technologies used, I am more a learner, I obviously know more than when I started building this project but don’t expect bullet proof code or circuitry; hopefully as I gave you the sources and diagrams you can improve anything as you see fit.
I am not an expert in either of the fields and technologies used, I am more a learner, I obviously know more than when I started building this project but don’t expect bullet proof code or circuitry; hopefully as I gave you the sources and diagrams you can improve anything as you see fit.
Credits & Acknowledgements
Shouts to the people below that helped me in this project:
- Credits to Akexorcist for making the source code of a basic joystick application I recycled. Check out his blog, Google+ and repository.
- Thanks Joseph Vitolla for helping me with advise on solar panels and electric engineering.
- Julio Fernandez Gomez-Aleixandre from which I got inspired to add the red scanner lights to the car.
- Julian Ilett a sort of personal legend/idol in general electronics and gadgets reviews, check his YouTube channel out.
- Soundtrack song of the video is a rework of the original Knight Rider TV show produced by like2upload
- Make: magazine featured s0lrider on their blog!
- Last but not least wanted to acknowledge the We Care Solar. A truly inspiring organization that promotes safe motherhood in developing regions using solar electricity.
Rationale for the project and Zambia trip
I will
travel to Zambia in September this year (2016) together with a charity
organization named Habitat for Humanity Great Britain. Our mission is to build houses, basic
housing as you can imagine, but essential for orphan kids so that they have a minimally decent place of shelter. I am an IT guy who is passionate about all the advantages that IT and/or electronics can bring to our life. I
thought I could design and put together S0lRider to get more familiar with photo-voltaic energy which is a game changer in Africa continent and at the same time raise funds for the cause by making all my efforts available to everyone in this site.
If you want to help us out please consider a donation here:
Questions & Contact
Feel free
to post a comment at the end of this page. I am also reachable via email at eslimasec -that email symbol- gmail.com or on twitter under
the handle @eslimasec

Congrats for your project. I hope you can make it to Zambia.
ReplyDeleteI have a question for you. Did you had any trouble with the direction of the wheels. I tried those in a project and still struggling to get then go straight.
Any advice?
Congrats for your project. I hope you can make it to Zambia.
ReplyDeleteI have a question for you. Did you had any trouble with the direction of the wheels. I tried those in a project and still struggling to get then go straight.
Any advice?
Two advices.
DeleteYou can renove the motor that goes slowly or you can difference how fast goes one or the other with the %PWM out.
sailor moon painting episode 5
ReplyDeleteamazing post. learn moreTop Guardians Review
ReplyDeleteI recently came across your blog and have been reading along. I thought I would leave my first comment. I don't know what to say except that I have enjoyed reading. Nice blog. I will keep visiting this blog very often.
ReplyDeleteElectronics and gadgets
I’m excited to uncover this page. I need to to thank you for ones time for this particularly fantastic read !! I definitely really liked every part of it and i also have you saved to fav to look at new information in your site. חשמל כשר
ReplyDeleteI’m excited to uncover this page. I need to to thank you for ones time for this particularly fantastic read !! I definitely really liked every part of it and i also have you saved to fav to look at new information in your site. חשמל כשר